
WOTT’s routine descriptions are a mix of standard rich text tags for styling, TextMesh Pro <link> tags for links, and my own <img> tags for images.
When I show the description, I parse it, separating the images from the text, and then create blocks of text, images and buttons (for images with links). I also complicate things by adding a <color> tag to links so they stand out.
The first version of the editor, which I knew was terrible, was just a big input box, which opened the full description. It allowed simple descriptions to be written, but relied on the user understanding tags for any styling. Because you can’t select in an input box, the only way I could add styling, links or images was to just add them to the end of the string, and let the user move them if they wanted.
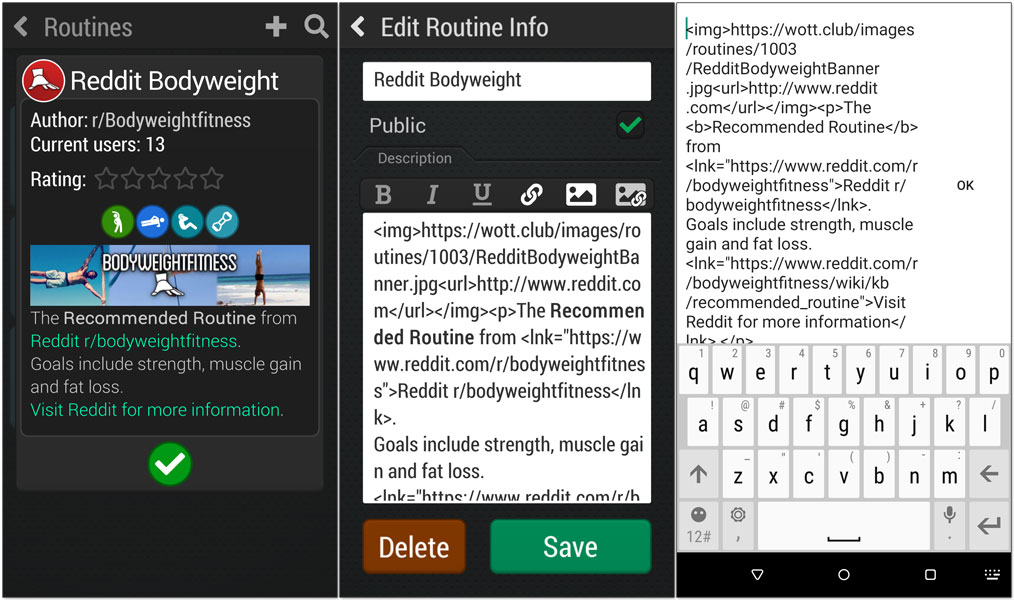
Of course since it opened the entire description in the input box on the mobile keyboard, it wasn’t long before a description would be to large to fit. Then it required scrolling which was a horrendous experience.
For something to meet my minimum acceptable level of quality, I need to use it to create content. If I want or need to cheat, it’s not good enough. Since I was creating descriptions in a text editor and copying them directly to the database, instead of using the editor, I knew something had to be done.
My first thought was to mimic native mobile text editing. I looked up what solutions others had found. Advanced Input Field looked really promising, but it doesn’t play well with standard and TextMesh Pro input fields. I have lots of input fields and I only need this functionality in this one, so I didn’t really want to change them all. And while this would solve the mobile input problem, it wouldn’t solve the problem of inflicting tags on my users.
By this time I had a pretty good idea of what I wanted to do. Since I was separating the description into blocks anyway, why not use those blocks for editing as well? That way larger areas of text can be separated into smaller blocks for easier editing, and images and text can be moved around using the same method as we use when editing routines.
I already had the basics. Adding buttons to a scrollable list, that can then be renamed, moved, or deleted is a staple feature of routine editing. I just needed to include a text box or image depending on what type it is. It didn’t take long to set that up.
Now users don’t have to see image tags, but what about all the other tags?
I really wanted WYSIWYG editing. A nice feature of rich text is that it shows tags when you edit the text on mobile, which lets my users edit tags and immediately see the results. I mainly needed to figure out how to select text so I could add styles and links to existing text.
In WOTT, many routine elements can be renamed but because they’re in Scroll Rects I can’t just use an input field. An input field is activated as soon as it’s clicked, so scrolling input fields doesn’t work well – they keep opening when you just want to scroll. Instead I use a standard text field, and swap it with an input field when I detect a long press.
This behavior is a great starting point for the description editor. It let’s me scroll text blocks, and separates the text displayed to the user from the text they actually edit. This allows me to hijack the results to add <color> tags to links without the user seeing them. More importantly it provides the basis for selecting text, since text can’t be selected in a mobile input field.
To start with I needed a way to select text, and a way to get the resulting indexes from the raw text. Luckily Stephan has provided both in TextMesh Pro which gave me a great head start.
Once I had basic selection working I needed to balance moving the block with modifying a selection. In keeping with mobile convention, a long press selects a word. Then dragging from within a selection modifies the selection, and dragging from outside a selection moves the block (to reposition or delete). The next evolution will include a selection box and widgets to adjust the selection to conform with standard mobile conventions which might require a bit of adjustment here.

Now I could select text and add tags around the selection, but this was where things started getting complex.
There are 4 versions of the text for each block:
- The rich text displayed to the user which they use to select. This also includes color tags for links,
- The raw text of the display text, which also includes color tags,
- The text the user edits, which includes all the tags except color tags, and
- The resulting text for the description which doesn’t include color tags, but has added paragraph tags so I know where to separate text blocks.
To further complicate things, I accidentally left rich text editing on for the input field, so when I was testing in the editor it wasn’t showing any tags, which got me all turned around in my thinking a few times.
My first attempt was to add tags to the raw text on either side of a selection. This appeared to work, but quickly resulted in a mess of tags, and ended up breaking fairly easily. I tried verifying the tags after each edit, removing strays, and doubles, etc. but that quickly ended up super complex, and still had lots of edge cases.
Instead, I decided to keep my own copy of the displayed rich text as a char array, with each entry having flags for bold, italic, underline and links. Links are stored as an index to a string array which holds the link url.
This made things so much easier. When adding styles or links from selected text, I can just modify the flags in the array. Then when I need the text, I save the array out to a string, recreating the tags where needed. This ensures there aren’t any stray tags or doubles and keeps everything nice and neat.
I think I ended up rewriting it about 3 times as I tried different things. I’m glad I stuck with it, because I’m super happy with the final result. Come and join us in Early Access to check it out for yourself.
And you can check out the code here on github. It’s not pretty or very well commented but should steer you in the right direction.
Can you send me the source code for this?
waw, that char-array-solution is very elegant.
I am looking now for a wysiwyg text-editor in unity and this post is kinda the closest I got. if you would put the asset on the unity asset store, it would be pretty succesful I think. really a hole in a market.
I faced a similar problem of tag-spaghetti once when trying to make a code-editor online. Gonna keep that char-array in mind whenever I dust that project off.
Thanks Vincent, I’m glad it was helpful.
I don’t really have time to manage an asset store release, but I will try to find time to put it on github.
Any update on the github? Im trying to my own implementation and am having a lot of issues tackling the many edge cases/indexing issues etc. The idea for the char-array makes sense for going from the array->text, but how would you update the char array when the user makes changes to the input field? (for example if the user highlights a block of the text and then deletes it, how would you convert the indexes of the selection in the text to the indices in the char array?
Yes the code is available here: https://gist.github.com/zerogravityent/514425b9bcee2895b417097f5ccb1a46
If memory serves, every edit results in the char arrays being recalculated
Hello,
Is the code still available ? github link doesn’t work.
Thanks
I’ve updated the link now
Hi, I know this is probably abandoned at this point since the github link and account are not valid anymore but is there any chance you can provide an active link to the source code for the editor?
I’ve updated the link now
This is great and would really help me, but the github link isn’t working. Would you be able to send me the code? Thank you
I’ve updated the link now